 how-to
How to Prepare Salt-Cured Ham for Dinner
Table of Contents
- Understanding Salt-Cured Ham and Why Preparation Matters
- Soaking Country Ham: The Essential Desalting Step
- Preparation Before Cooking: Trimming, Scoring, and Glazing
- Cooking Time for Salt-Cured Ham: Methods and Temperatures
- Country Ham and Egg Breakfast Skillet: A Traditional Pairing
- Slicing, Serving, and Flavor Balancing
- Storage and Preservation After Cooking
- Frequently Asked Questions
Last Updated: September 30, 2026
Understanding Salt-Cured Ham and Why Preparation Matters
A salt-cured ham is a country ham that has been preserved through a traditional curing process using salt, which draws out moisture and creates deep, complex flavors. These hams are aged for months, developing a firm texture and concentrated taste that sets them apart from mass-produced supermarket options.
A salt-cured ham requires desalting before cooking. The curing process that preserves the meat also makes it intensely salty. Skip the soaking step, and your dinner will be inedible. Get it right, and you'll unlock the rich, nuanced taste that makes these hams worth the effort.
Understanding the steps, soaking time, cooking temperature, and flavor balance, transforms a good meal into a memorable one.
Soaking Country Ham: The Essential Desalting Step
Desalting removes excess salt accumulated during curing. Most people underestimate how much soaking matters and rush it, then wonder why their ham tastes oversalted.
Cold Water Soaking Method
Fill a large pot or clean cooler with cold water and submerge your ham completely. Use about 1 gallon of water per pound of ham.
Change the water every 6-8 hours to gradually pull salt from the meat. Most hams need 12-24 hours of soaking depending on size: smaller hams (8-10 pounds) need 12-16 hours, larger ones (12-16 pounds) need the full 24 hours.
The process requires attention: use a clean container, keep the ham in a cool place, change water consistently, and don't rush, under-soaking leaves the ham too salty.
Testing Salt Levels During Soaking
Taste a small piece after 12 hours. The meat should taste salty but not overwhelming. If still intensely salty, continue soaking and change the water again.
Slice a thin piece from the edge and taste it raw. Outer layers desalt faster than the center, so if the edge is acceptably salty, the interior needs more time.
Preparation Before Cooking: Trimming, Scoring, and Glazing
Once desalting is complete, trim and score the ham before cooking to balance presentation and flavor.
Remove the skin with a sharp knife, leaving about 1/4 inch of fat underneath to protect the meat and carry flavor during cooking.
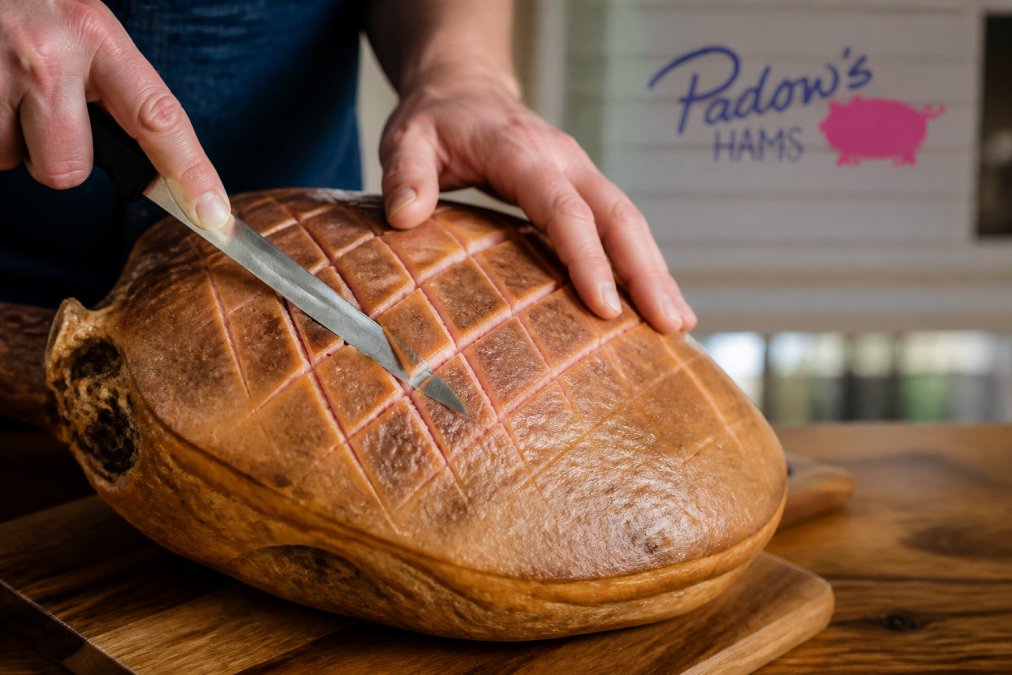
Score the ham in a diamond or crosshatch pattern, keeping cuts about 1/4 inch deep to help glazes penetrate and add visual appeal.
Glazing to Balance Saltiness
A glaze must balance competing flavor profiles to enhance the ham's natural complexity, not just add sweetness.
The three core glaze approaches are:
Sweet-and-Spicy Glazes: Combine 1 cup packed brown sugar, 1/2 cup whole grain mustard, 2 tablespoons apple cider vinegar, and 1 teaspoon black pepper. The mustard's acidity prevents the glaze from becoming cloying. Apply after scoring and reapply halfway through cooking for caramelization.
Honey and Spice Glazes: Combine 1/2 cup honey, 2 tablespoons Dijon mustard, 1 tablespoon apple cider vinegar, 1/2 teaspoon ground cloves, and 1/4 teaspoon cayenne pepper. Apply in the final 30 minutes to prevent burning.
Maple and Black Pepper Glazes: Whisk together 1/2 cup pure maple syrup, 2 tablespoons Dijon mustard, 1 tablespoon apple cider vinegar, and 1 teaspoon freshly cracked black pepper. Apply early and often for a glossy, caramelized finish.
Application and Timing
Apply glaze after scoring and let it set 15-30 minutes. During cooking, baste every 45 minutes with pan drippings mixed with additional glaze to build flavor layers and prevent drying.
In the final 20-30 minutes of cooking, increase oven temperature to 400°F and apply a final coat of glaze. This creates a caramelized, glossy exterior that looks restaurant-quality and adds textural contrast to the tender meat beneath.
Cooking Time for Salt-Cured Ham: Methods and Temperatures
Cooking a salt-cured ham is straightforward, but timing depends on size and method. The goal is heating the meat through while allowing the glaze to caramelize and develop flavor.
Baking vs. Boiling Techniques
Baking is the preferred method. Place the scored and glazed ham in a roasting pan with 1/2 cup water, cover tightly with foil, and bake at 325°F.
Cook approximately 15-20 minutes per pound. Use a meat thermometer to verify doneness rather than relying solely on time.
Boiling is faster but produces softer meat and less appealing appearance. If you boil, simmer at a gentle boil for 15-20 minutes per pound, then finish in the oven with glaze for 20-30 minutes.
Internal Temperature Guidelines
Use a meat thermometer inserted into the thickest part without touching bone. Most salt-cured country hams are pre-cooked, so target 140°F. Fresh ham requires 160°F.
Most salt-cured country hams are pre-cooked, so 140°F is your target. This temperature ensures the ham is heated through while remaining moist.
Country Ham and Egg Breakfast Skillet: A Traditional Pairing
Salt-cured ham shines in breakfast applications. The salty, complex flavor pairs beautifully with eggs, and the meat's firm texture holds up well in a skillet.
Slicing, Serving, and Flavor Balancing
Slicing Technique and Presentation
How you slice your ham affects both presentation and eating experience. Use a sharp knife and slice against the grain for maximum tenderness. Thinner slices (about 1/4 inch) showcase the ham's texture better than thick chunks and allow the glaze's caramelized exterior to shine on each piece. Precision in these cuts depends entirely on maintaining sharp kitchen knives, which ensures the blade glides through the cured meat without tearing the delicate fibers.
Strategic Flavor Pairing to Cut Salt
Salt-cured ham is naturally salty, so pairing it with complementary flavors isn't optional, it's essential to a balanced meal. The goal is to create contrast that makes the ham's complexity shine rather than overwhelm the palate.
Acidic Elements are non-negotiable. Serve the ham with:
- Whole grain mustard or spicy brown mustard (the acidity cuts through richness and echoes traditional pairings)
- Pickled vegetables: pickled peaches, pickled onions, or bread-and-butter pickles provide brightness and palate cleansing between bites
- Vinegar-based sauces: a simple reduction of apple cider vinegar, brown sugar, and mustard seed complements the ham's aged character
- Fresh citrus: lemon or orange segments alongside the ham add brightness without competing
Sweet Components balance salt without adding more sugar to the glaze. Serve alongside:
- Glazed carrots or roasted root vegetables with a touch of honey
- Candied yams or sweet potato casserole (the natural sweetness of the vegetable, not excessive sugar, is key)
- Fruit chutneys: apple-onion chutney or peach chutney provide sweetness with savory depth
- Baked beans with molasses (the beans' earthiness and the molasses' complexity work with the ham's intensity)
Fresh Herbs and Greens add brightness and cut through richness:
- A simple green salad with vinaigrette (the greens' freshness and the dressing's acidity are essential palate cleansers)
- Herb-forward sides: parsley salad, watercress with lemon, or arugula with shaved Parmesan
- Herb butter for vegetables: fresh thyme, rosemary, or sage stirred into softened butter and served with roasted vegetables
Creamy Sides (used strategically) provide textural contrast without adding salt:
- Mac and cheese made with sharp cheddar (the cheese's sharpness echoes the ham's intensity)
- Scalloped potatoes (use a light cream sauce, not heavy, so the ham remains the star)
- Buttered vegetables: green beans, Brussels sprouts, or asparagus with brown butter and herbs
Troubleshooting Over-Salted Ham
Slice and Soak Method: Slice the cooked ham into 1/2-inch-thick pieces and soak them in cold water for 1-2 hours. This removes additional surface salt. Pat dry before serving or reheating. This works best for the outer portions of the ham, which carry the most salt.
Storage and Preservation After Cooking
Once cooked, your ham keeps well in the refrigerator. Wrap it tightly in plastic wrap or store it in an airtight container. Properly stored cooked ham lasts 5-7 days in the refrigerator.
Frequently Asked Questions
Do you need to soak salt-cured ham before cooking?
Yes, soaking country ham is essential. The salt-cured curing process creates a highly salted product that requires desalting through cold water soaking. Most salt-cured hams benefit from 12 to 24 hours of soaking, changing the water every 4 to 6 hours. This removes excess salt while preserving the authentic flavor that makes country ham distinctive. Skip this step and your ham will be unpleasantly salty.
How long should you boil a salt-cured country ham?
Cooking time for salt-cured ham depends on weight and method. For boiling, allow 15 to 20 minutes per pound in simmering water. A 10-pound ham typically takes 2.5 to 3 hours. For baking, plan 15 to 18 minutes per pound at 325°F. Always check the internal temperature with a meat thermometer, most salt-cured country hams are pre-cooked, so target 140°F. The aged, dense texture of country ham requires longer cooking than standard supermarket ham.
What is the best way to reduce the saltiness of country ham?
Cold water soaking is the primary method for reducing saltiness in salt-cured ham. Change the soaking water every 4 to 6 hours over 12 to 24 hours. You can test saltiness by tasting a small piece, if it's still too salty, continue soaking. After cooking, flavor balancing with brown sugar glazes, pickling spice, or honey can offset any remaining saltiness. Some cooks add the ham to fresh water for the final cooking stage to further reduce salt content.
Can you bake a salt-cured ham without boiling it first?
Yes, you can bake salt-cured ham directly after soaking, without boiling. After proper desalting through cold water soaking, trim the rind, score the surface, apply your glaze, and bake at 325°F for 15 to 18 minutes per pound. Baking alone produces a caramelized exterior and tender meat. Many prefer this method over boiling because it retains more moisture and develops better flavor. Just ensure you've completed the full soaking process first to remove excess salt.